Quick Start
This guide shows the quickest way to get a loot table working. The assets from the completed guide can be found in the example map's LV_QuickStart level.
Create a Struct
This structure will hold the data we will reference with the loot table.
- Navigate to your desired folder in the content browser.
- Right click, and under the Blueprints category, select Structure.
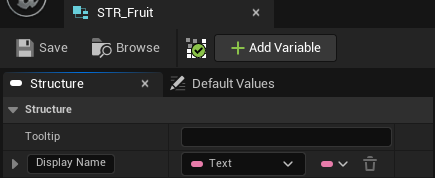
- Name the structure STR_Fruits and open it.
- Add a variable, then change its type to Text and its name to DisplayName.
To keep things simple, we'll just include a DisplayName variable with type Text. In your structures, you may add any data you wish.
Create a Data Table
Now that we have the struct defining our data, we can create a Data Table which holds the data we will reference.
- Right click in the content browser and under the 'Miscellaneous' category, select 'Data Table'.
- A configuration dialog will open. Select 'STR_Fruits' as the row structure of the Data Table.
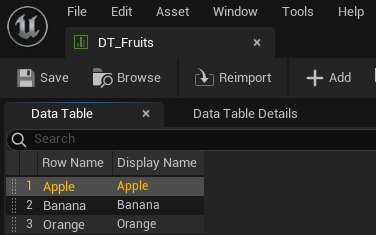
- Name the data table 'DT_Fruits' and open it.
- Perform this three times, for row names 'Apple', 'Banana', and 'Orange':
- Click 'Add' to add a new row to the table.
- Rename the row according to the name above.
- Change the DisplayName variable according to the name above.
- After finishing, your data table should appear like this:
Create a Loot Table Template
- Navigate to your desired folder in the content browser.
- Right click, and under 'Miscellaneous' category, select 'Loot Table Template'.
- A configuration dialog will open:

The Source Row Struct is the row struct used by all referenced data tables and loot tables.
- Select STR_Fruits as the Source Row Struct.
- Leave Distribution Type as STUnlimited Dist.
The Distribution Type affects how random items are generated by the loot table. See Discrete Distributions for more info.
- Click confirm. A new Loot Table Template asset will be created in the current folder.
- Name the asset 'LT_Fruits'.
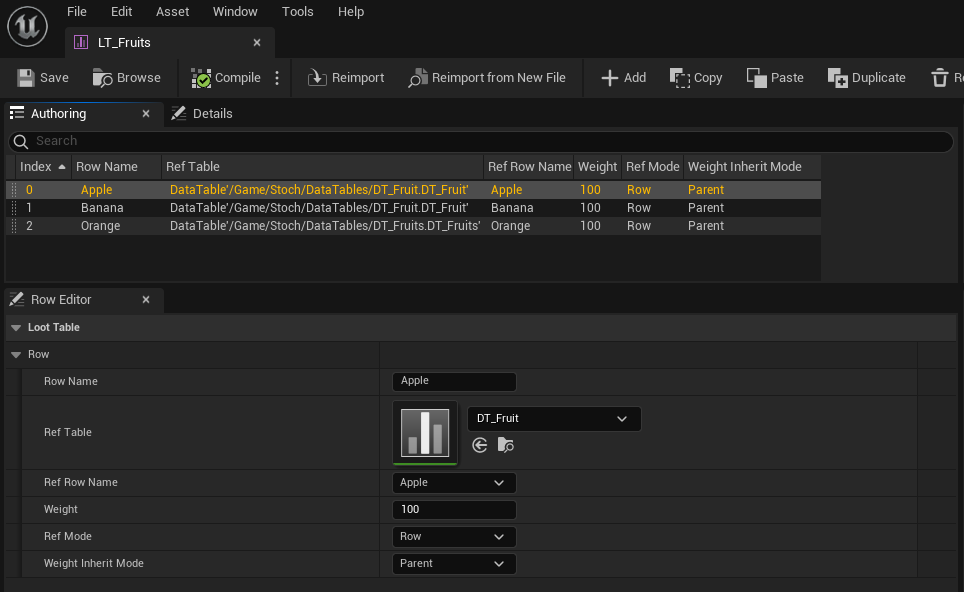
- Double-click the asset to open up the Asset Editor:

The Loot Table Template Asset Editor is used to define loot table 'templates' which can be instantiated into Loot Tables at runtime. Think of Templates as defining what a Loot Table will contain, and Loot Tables as the actual object which is sampled from. Templates may only be created and edited within the editor, while Loot Tables may be created and edited at runtime.
- Perform this three times, once for each of 'Apple', 'Banana', and 'Orange':
- Click the Add button to create a new row in the Authoring tab. Select the newly created row.
- In the Row Editor tab:
- Change 'Row Name' to the name listed above.
- Change 'Ref Table' to 'DT_Fruits'.
- Change 'Ref Row Name' to the name listed above.
- Change 'Weight' to 100.
- After finishing, your asset should look like this:
Because Auto-Compile is on by default, your build tab should show the compiled loot table template:

Instantiate the Loot Table
Now we will create the Loot Table at runtime from our compiled Loot Table Template. For this tutorial, we will spawn the Loot Table in an actor blueprint, but you may instantiate the loot table in any runtime class.
- Create a new actor blueprint.
- Add new variables:
- Add a new variable named Random Stream and set its type to Random Stream.
- Add a new variable named Template and set its type to ST Loot Table Template. Change its default to our template LT_Fruits.
- Add a new variable named Loot Table and set its type to ST Loot Table.

- Add functions starting from the Begin Play event and connect their execution pins:

The random stream is used for random number generation. The seed determines what loot will be generated; The same seed always yields the same loot. Here we will initialize the stream with a random seed.
The Outer for the Loot Table should usually be the object which stores your loot tables. It's recommended to have it be an authoritative, non-replicated object. We use the actor blueprint in this tutorial to keep things simple.
Sample from the Loot Table
Finally, we can sample from the loot table to get our random fruit(s).
- Add the Bulk Sample (Ordered) function from the loot table:

The Sample Count parameter is the number of times to sample from the loot table. Each 'Sample' yields one row.
The Bulk Sample (Ordered) function is one of three sampling functions you may use. This function returns multiple samples as an array sequence of Data Table Row Handles.
Print Sampled Rows
For simplicity, we will use UE5's debug print function to show what we sample.
- Add the following functions after the Bulk Sample (Ordered) function:

This will print out each row we sample in the order that they're sampled.
Result
- Open up a level and add our BP_QuickStart actor into the level.
- Press Play In Editor.
- You should see debug messages similar to these:
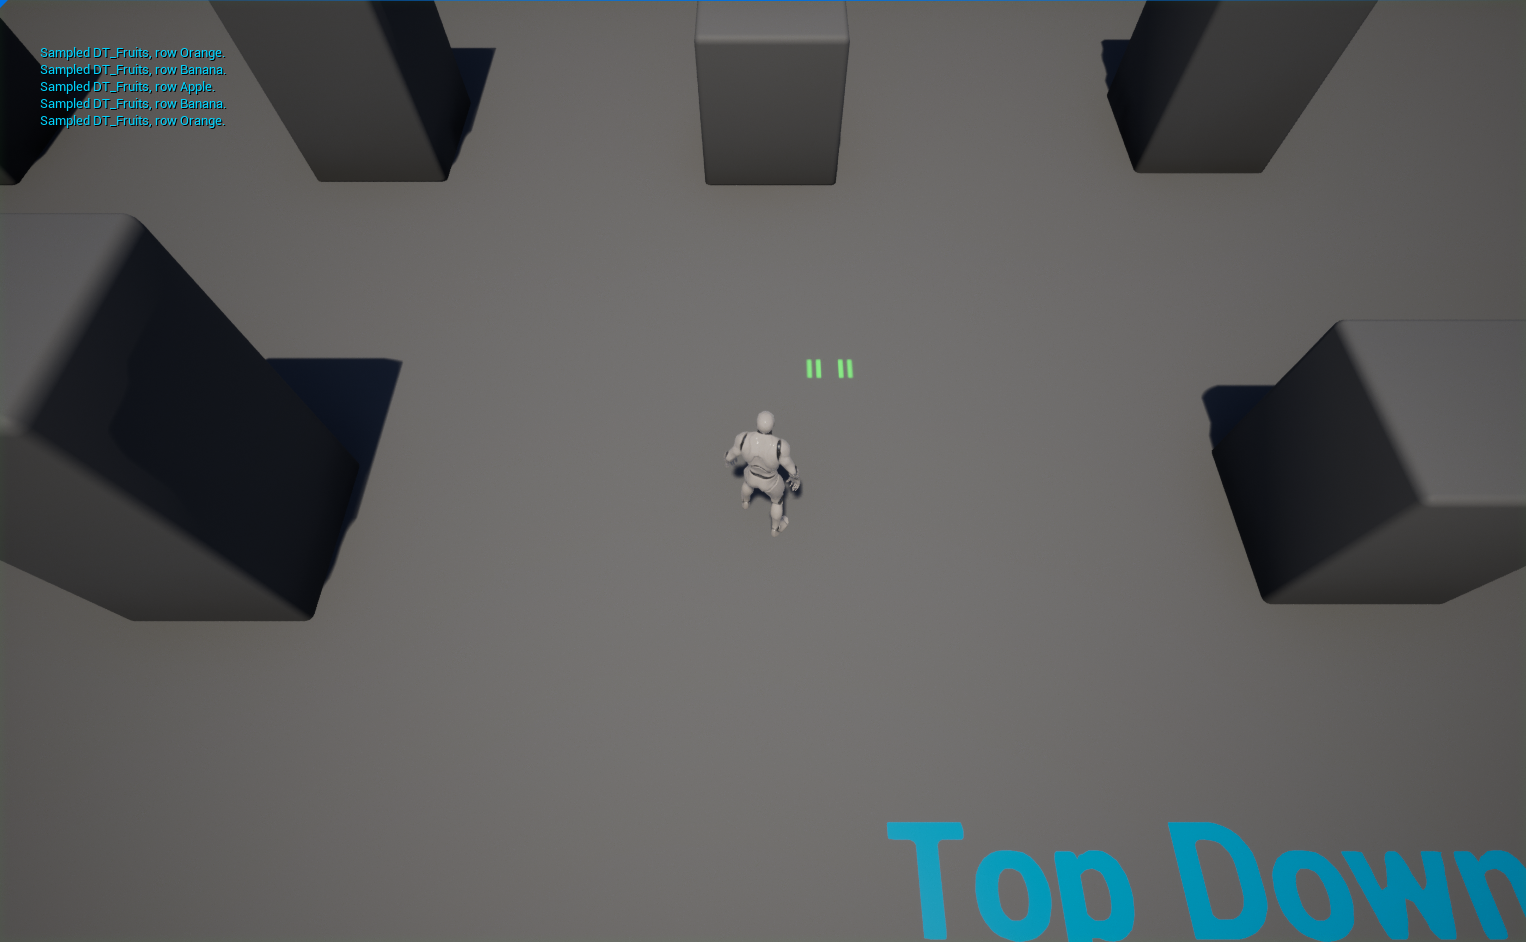
The messages you see will be random between Apple, Banana, and Orange with 33% probability for each one.
This concludes the quick start guide. For more in-depth use cases, see other guides.